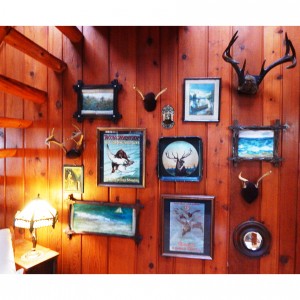
It seems gallery walls are everywhere these days, from HGTV to Houzz, Apartment Therapy to Pinterest. We absolutely love the look, but know it can be a rather daunting project, from gathering the right components to framing, placement and spacing. We recently created a gallery wall display using some of the fabulous vintage rustic pictures, signs, antlers and wall art available at vintageadirondack.com, and thought we would share our easy 5-step process to help you put together one of your own.
A gallery wall is an opportunity to make a statement in your home about who you are and what you like. Here at vintageadirondack.com, of course, we love rustic pictures, paintings and signs, and also collect pieces that reflect the outdoors and the natural world. But even if your style is completely different, you can still use these steps to create a gallery wall that is uniquely you.
Here’s how our gallery wall turned out:
And here are the 5 steps:
1. Create Your Vision – Try not to overthink it, just jump in and enjoy the creative process. It’s not like you can’t change your mind. Start by picking a theme or a color palette that complements your room. We went with vintage natural elements, from stags to deer antlers to original pastel artwork of water and landscapes.
2. Hunt & Gather – You can do this quickly or collect the elements for your gallery wall over a period of years. It’s great to mix things up, with some color and some black & white, some photos and some paintings, some signs and some dimensional elements that add visual interest.
3. Frame – Your gallery wall isn’t just about the art on display, but also the frames that enhance it. You can stick to one style, or mix and match with vintage and antique frames that makes it feel like your art has been collected over the years. We chose mostly antique Adirondack frames that highlight the art we wanted to feature.
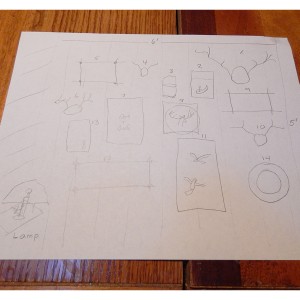
4. Placement – You can’t just start nailing up pictures or you’ll soon have a wall full of holes. Measure your space and use some painter’s or washi tape to outline the borders on the floor. Try a few different layouts on the floor until you have an arrangement that feels balanced and easy on your eye. We moved our 14 pieces around many times until everything held together.
Once you have a grouping you like, make yourself a map and number the elements so you can transfer your vision to your vertical space. Ours looked like this:
5. Hang it Up! – Start by hanging one element and build from there. Ideally you want to have a few inches between each piece. We think it’s best to go off center rather than hanging one big picture in the middle. It makes the arrangement less formal and more interesting. A great way to avoid multiple holes in the wall as you make adjustments is to use Command strips instead of traditional picture hangers with nails.
Best Part: If you like our gallery wall you can find all of the elements we used available for sale at vintageadirondack.com!


Like This Post?
Please subscribe to our blog to receive new posts by e-mail. We will not share your information with anyone.